Saturday, May 26, 2012

The Leviathan, Singer's 29 - 4

1905 Singer 29K-4
It is called many things such as the boot patcher, the cobbler, the leatherworker or the harness stitcher.  I call it the Leviathan after the large biblical sea monster.  The model number is 29-4  or 29K with this particular one being made in 1905.  They were in production earlier and later with modifications and model number changes.  Even today,  in the shop I am in during the week has two similar (though much more modern and electric) machines machines made by Consew and Brother.  Perhaps this huge thing could be useful to me?  Would it even work right?  Hmmm.
Gustave Dore, 1965.  "Destruction of the Leviathan"
 First thing was that it needed a few parts.  To my surprise, parts are easily available for this type of vintage machine.  That is not always the case.  Because so many are in use today there are dealers who cater to this.  Some parts from more recent models are compatible as well.  In this situation I needed a tension spring and one was on it's way to my house days later though it was made for a 1940's model.  Fit perfectly.  Needles, Bobbins, Wire threaders and rubber bobbin tires are available inexpensively.  Here's where I got my parts  - Sharp Sewing Supplies but there are many sources.
I found downloadable manual free of charge through the Singer Company.  Click this link: Singer 29K manual


Does it even work?  Well yes it does, but it took some getting used to.  The learning process is still going on.  It is quite different than a regular lockstitch in two ways:  The presser foot works as the feed from the top and the presser foot can be manipulated to move in different directions.  The reasons for this has to do with the primary function it was designed for.  That would be very close work as with shoe repairs.  It makes a lot of noise when operating but it is a pleasant one.  It sounds like "work".  Clank clank clank.

 As an example of it's work, see the image below.  With this pair of shoes, the stitching was coming apart at the bottom side and the overlapping part.  I was able to reinforce the stitches along the bottom then completely turn it to go the flap.  It did an excellent job and saved a favorite pair of Minnetonka shoes.  This would have been a tricky job even by hand because of the tight space at the bottom.  Very cool, very cool indeed.
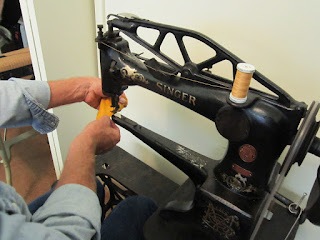
The presser foot moves by moving this brass handle.
It is quite powerful and sews through heavy leather with no hesitation.  It is slow and cumbersome for sure but with leather fast is not what I am looking for.  I want a one time pass though so as not to make holes in the work.  I also have used this with heavy webbing.
Singer 29k Stitch Sample
Here is a stitch sample made with fairly heavy good quality leather.  The thread used is Jeans top stitching thread.  Heavy thread such as #69 works well too.  I have heard that the presser foot teeth on the underside will leave marks on the surface.  That is a possibility but has not occurred yet with anything I have yet done.  Another reason to get your seam right the first time.
The bobbins are very small and so is the machine arm.  This is what it looks like with the cover removed.
The design is to allow access to tight spaces and that has been very very handy a few times.  A drawback is that it also makes this less practical for doing very large things that need support.  There was a table extension available for these when you purchased them back when new.  There are plans for making them now and I may do that someday.  The time that would have been useful to have was when I was making a bag.  Holding it was a bit awkward on that tiny arm space.  This is what the extension table looked like as sold originally


Anyone who finds this post and is wondering how it's threaded may take note of this next section.  First, get a manual.  You NEED it to explain the bobbin loading and threading.  Simply put, it is not like other machines and you are not going to figure it out on your own.  The outside threading is easy to see but this part was a little confusing to me so here's a picture to clarify.

The thread is pushed down this hole after it leaves the tensioner.  It goes all the way down to the presser foot. 
You will need a threader like this.  There is a tiny hook at the end to hold the thread as you push it down.  Give yourself a lot of extra thread for this, as it can be very tiresome to keep having to re-do it. 

This is where the upper thread comes through.  To get at the bobbin, you will need to loosen the screw and turn the cover.
 Once you get familiar with the machine it is a kind of interesting thing to behold.  It is very masculine.  Of all the machines here this is the only one that my husband actually touched.  He was even the first one to use it.  Go figure.  Is it worth having?  Of course I always say yes but this one has a very different purpose than the others.  So far it has been very useful for repairs, less so for creativity.  If you fix heavy things, then maybe you could use this.  If you just want to make things than maybe not.  That said, I have made a few things with it that would have been very difficult otherwise, like these little shoes. What's another machine anyway.


My leviathan, it is a beautiful beast.
Saturday, March 31, 2012

The "Grasshopper" Elna's Number 1

Elna 1

This was one machine I had to have, upon seeing it.  Not because I needed it, not because of how well it works or even how rare it is.  Just because it is so amazing cool.  The design is unique and color, well I do have a fondness for machine that are colored anything but white.  I introduce you to the Elna company's first machine, the #1 also widely known as "the Grasshopper".  From this view you can see why it got this nickname.  The knee lift and green color has a certain grasshopper quality.

The design was created by Ramon Casas from Spain in the mid 1930's.  His observations about the difficulty of sewing sleeves of garments brought about free arm.  Timing was a problem for this idea as war began in his home country and later in Europe.  Years would go by before the design came to production.  That is why it has a very 1930's look.  The company that finally did make this machine was Tavaro SA of Geneva Switzerland in 1940.  It was a munitions factory that decided to take on this project.  It was a resounding success.  This would explain the look of the case, just like an ammo box.  From the outside one would not guess a sewing machine was inside.  That's also why it has no model number, it is simply 1.  It was the only one they made, but with this success it was not the last.

Post war sales were quite brisk, as this little machine represented a major change in the home machine industry just when it was needed most.  Now, timing was on it's side.  Postwar demand was big for a lightweight (15 pounds) free arm machine for simple basic tasks. It was the world's first free arm sewing machine.
Advertising for a Grasshopper

My particular machine was made in 1950.  By the way, it was good year for sewing machines in general.  I have several made in and around that year, all excellent.  Singers, Pfaffs and Elna's Oh my. As an aside, this model was copied almost exactly.  I saw one in an ad but did not buy it, possibly made by General electric or Westinghouse.  If anyone knows help me please.  Just like the Grasshopper only in grey.  I am so sorry I did not get it.  They are out there still.
Elna 1's accessories set
It is a strait stitch sewing machine that takes common low shank attachments.  The bobbins are the normal Elna type, and you can use 15x1 needles.  I get all those easily but if you need any particular parts are out there.  I got some replacements rubber foot pads from White's Sewing Center.  This is an excellent resource with all kinds of things for your Grasshopper and Supermatics too.
My Grasshopper came with a small set of accessories and a tiny tin box. The one thing it has that has proven to be a really helpful one is the part made of black plastic upper left.  It is a slow gear.  Many machines today have this built in feature but in 1950 not so.  By placing it on the machine it slows down the speed in an even way, perfect for darning or very precise work. It fits on like this:
Elna 1's low gear cover.
Being a low shank machine makes it easy to use attachments.  I use a regular 1/4" foot all the time.
Elna 1 with quilter's piecing foot attached
Using the Zig Zagger
There's more.  It works well with a walking foot and a zig-zag attachment.  In my case, I use a little one called a Chadwicks ZigZagger.  
NEW EDIT
When I wrote this post some time ago, I was not able to get a buttonholer to work on this machine.  Since then, with the help of a reader, I was able to get it to work.  I was just not thinking about it enough.  Here is how it works:

Singer Buttonholer with Elna 1
The key to success here is using the little feed dog cover that comes as part of the attachment set.  Normally the buttonholer has it's own plate but that does not fit e little free arm of the Elna.  Use the accessory shown in the photo.

Now the buttonholer will work fine.  

Adjusting the Stitch Length
Elna can be adjusted by lengthening the stitches but that's about it in the fancy automation area.  Here is how to set the length and an example of the stitches it makes.

To set the stitch length.
Stitches for Elna 1

The size makes this a easy machine to take places much like the famous Singer 221 Featherweight.  The case also folds out to make room for big things like quilts.  I have used it for that but really, the space to the right of needle (harp space) is waaaaay to small to do this all the time.

Some things to know about the Elna #1.  They are quite simple but like everything to be oiled.  I keep this little one very clean and oil all parts as required.  This leads me to mention a starting discovery:  It will sometimes smoke when first started   Boy this scared me first time!  I later found out that it's pretty normal and not to panic.  This great help came from a Yahoo group for vintage Elna machines.  I recommend finding help if you need it, there are many fans of these old timers.  This machine is also prone to running slow.  This could be mine, however.  I prefer a foot control but these come only with a knee lift.  It does make it easier to travel with as there is one less cord to tangle and that's nice.  That leads me to this last topic, it travels so well and is interesting to all who see it.  You will, however, be pounded with questions and comments when you take this out of it's case.  It's impossible to quietly start sewing on it if there is anyone else around.  That includes people who do not sew.

If you live in a complicated world, sometimes it's nice to just enjoy the simplicity of an old sewing machine.  This one is all that.


Monday, February 20, 2012

The Singer 12 "New Family"

Singer 12 "New Family" Handcrank 1884
A new member of the sewing machine family came to live with us recently.  It is one I have long been interested in, the Singer 12.  It is also called "the New Family" machine.  This particular one was made in 1884.  So tiny, so beautiful despite the condition.  This was a sad case.  Here is what it was like when I got it.


Rusted and frozen.
The machine was very well used and then left where water got to it from what I can tell.  The rust was and is quite bad.  Because of that, the machine has large areas where the paint is gone and some parts that are irreparably damaged.  The good news is that it's complete.  It even has it's bobbin.  Singer 12's are not super rare but still not common enough for parts to be easy to find.  That means I will have to make due with what is here.  Thank goodness for Evaporust.  It has cleaned up many small parts already.  
The slide plates are in poor shape with one not removable.  I was able to get one free so as to be able to get the bobbin and shuttle in order. The shuttle moves side to side!
Horizontal orientation for the shuttle.
 This is one area that is quite different than any other Singer I have - the bobbin tension is set by weaving the thread though little holes in the shuttle.  It's a bit complicated and I am still figuring it all out.
Bobbin and Shuttle.  Note the holes and spring in the shuttle.

People who like these old machines will eventually come across this issue at one time or another.  Old iron is heavy and fragile.  That's a terrible combination.  This Singer 12 had a broken piece that made it unstable.  I resorted to this method, and it worked perfectly.  It was glued with JB Weld. 
Repaired with JB Weld

I found a Singer 12 needle set and new rubber winder tire.  If you find you need one, the rubber tire for the winder is the same size as the ones for the Singer 29-4.  That is a fairly easy to find part.  I am still searching for a good source for needles but Ebay does have them.
Cleaning was slow and there was a lot of debris inside.  Dirty!  For this process I used Gojo non-pumice and cotton balls.  Later I used sewing machine oil.

After some cleaning.
The Singer 12 has a system for setting in the needle that can be a problem.  You must set the needle by sight, not by setting it in a slot.  It is not too hard, just takes some attention.  The needles go in with the groove and eye facing you.  Here is a photo of the placement.
Needle placement.  Note the tiny part at the top of the clamp.
Now to the sewing. Would this even work?  It was not looking good.  It took a while to get it right as this machine is so different that the model 27.   Even putting it together after cleaning was a little tense.  Thankfully I did take photos of where everything was before I removed the parts so as to put it back correctly.  So many issues!  

The tension discs are not in good shape from rust and also a problem with the thread take up or check spring caused all the mess.  What about the crazy shuttle thread winding?  Add to it the needle placement adjustments through trial and error.  Eventually I did get it to make a decent stitch.

There will be more work to come.  There is hope.  This little machine deserves to be useful again and I'll see to it that it is.

Thursday, January 19, 2012

Easy Home Canning Labels

I love sewing, for sure but also enjoy home canning.  This brings me to the purpose of this day's entry: How can you make a good label that doesn't stick to the jar forever?  Here's a good solution.

It starts with making a fun label.  I make labels online, print them on resume paper, then cut them out. To get some help, go to Label Templates.  This is the Avery company's website.  They have a lot of cool things there but what we need today is the templates for address labels.  You can choose a template for the size you'd like for the jar size you have.  A good basic size is 1 1/2 x4" or similar.  To use the site you'll need to register, then choose to create a label online.  It's quite easy and you can even add artwork from their files or use your own.  Remember,  the label won't be a address label.   Add an image, change the font size, style and color any way you want.


When it comes time to print, use paper as opposed to a sticky label.  I use resume paper as it's a little heavier and holds up better than copier paper.  You can then cut out the labels after they are printed.   Cut out what you need and set them aside.

To adhere to the jars, use milk.  I place a small amount of milk in a cup and a basting brush.  Brush the milk lightly onto the back of the label and hold in place briefly.

Making labels this way works great, comes off by soaking in water for a minute and best of all lets you be creative in making fun labels for your canned food.

Friday, January 13, 2012

The Pfaff 332 Sewing Machine

Pfaff 332 Made in Germany 1957.
This is a gem that deserves a little attention in the vintage sewing machine world, so I'll do my part to shed some light on this model.  This one came to me though a Craig's List "For Free" post.  It was from an estate, it was left behind from the garage stuff.  I can see why it was not chosen to go with anyone.  It was very dirty and not working.

Before Cleaning
It was the dirtiest of all the machines I have taken in, and believe me that's saying something.  It had a big chunk broken off the flywheel where something big fell on it, pry marks from someone trying to open the upper case and wood shavings inside (That was a first) and best of all the needle was in wrong.  That must have been what made the owner mad.  With a new bobbin, oil and a good cleaning it worked.  It was very loud and fast, gosh this was one powerful machine.  What a gem!  What it lacks in beauty it has in businesslike efficiency and power.    I have an older Pfaff 131 so am familiar with some of the features and found there are some improvements to that model.
Pfaff 332 Bobbin Case

 My favorite change to the Pfaff line is the bobbin case access.  To give some background, the only thing I do not like about my older Pfaff is that to get to the bobbin you have to turn up the entire machine and remove the bobbin case.  Big pain, particularly with such as heavy sewing machine.  Now, you can get at it so easy!  That brings me to the second thing, that is the handy extension table.
Pfaff 332 Fold Up Sewing Bed
There are many machines with free arm capabilities and many have a table/bed that can be attached to give the support when making a large project.  This one is different, it folds up from the machine itself.  That is great, as it won't get lost or be somewhere far away when you need it most such as the back of the closet.  Even better, you can add to make it larger buy attaching an extension.
Pfaff 332  Bed Extension
The Pfaff 332 has the capability to do zig zag, reverse and a bunch of the usual decorator stitches.  It originally came with a guide that you can turn around to get stitches by combining numbers as shown with those corresponding on the machine.
Pattern dials and spool pins

I do not have an example of this as to date, I have not even tried to use them.  The dial is on the left, the built in pattern cams are inside the top cover near this.  It's nice to know it can do these things but so far I just haven't needed them.

In this photo there is another improvement in the Pfaffs:  The ability to turn the spool pins down.  If you have ever broken a spool pin or bent one by accident, here is the solution to prevent this.  It makes for a very tidy way to ready for storage.

This sewing machine did not have any attachments when I got it but that has not proven to be a problem as it takes easy to find low shank zig zag accessories.  If you have this model, you may want to get a walking foot and a roller foot to help with heavier work.  It took a few tries to get a walking foot that would work well with this machine so I've included a photo so you can save some trouble.

About the stitching and workmanship.  That is where this sewing machine shines.  It can sew lightweight cotton all the way to outdoor Sunbrella fabric.  It does each one equally well.  Because it is harder to find a machine that does heavy fabrics well and that is a need I do have for making outdoor things like Cordura nylon packs, I save this special task for this particular machine.  With heavy thread, big needle and a small adjustment to the bobbin  it sews through with no problem.  I have machines with better strait stitches but considering the utility of this, that's not a big deal.  When I first got it I had trouble with speed, it seemed to be too fast to do intricate work.  With time and more oiling, that has somewhat subsided.  Maybe it took too much power to get it going, where now everything is more sensitive.  I don't know why but it is easier to use after a few years.  Maybe it just likes me better now!  In a perfect world this machine would have a slow gear for special work.
Sort of masculine, my gray 332
In summary it is a fine machine and a good choice for someone who wants a no fuss worker.  It is simple enough for a beginner but would be best for someone who wants a heavier duty machine.  That it can do zig- zag stitches and take low shank attachments makes it one of the more versatile vintage machines.  It's no featherweight but it's not overly heavy either.  I carry it in a specially made for it canvas bag with no problem.  There is a disadvantage is that parts are getting harder to find, such as timing belts.  That said, they rarely break or need repair.  If you see one, get it.  If you are offered one, take it.